Trying out Scappman – Automated Third-Party patching in Intune

Scappman is a cloud only solution that automates the installation and updating of applications within Microsoft Intune. Over 400 different third-party applications are supported as of today. In this blog post, I will take a look at setting up Scappman and trying out the service as an automated solution for third-party patching within Intune. Basically, Scappman is installed as an enterprise application (Azure AD) in your tenant and the service principal then needs several Microsoft Graph permissions to do its job in Microsoft Intune.

Initial Setup
I headed to the Scappman portal and registered a trial.
I authenticated with a Global Admin Microsoft Account from my tenant and Scappman requested several permissions which I reviewed and then granted to the application.

Scappman requires the following permissions:

APIPermissionType
Microsoft GraphMaintain access to data you have given it access toDelegated
Microsoft GraphSign in and read user profileDelegated
Microsoft GraphRead and write all groupsApplication
Microsoft GraphRead directory dataApplication
Microsoft GraphRead and write Microsoft Intune devicesApplication
Microsoft GraphRead and write Microsoft Intune appsApplication

Adding Applications to Scappman
At this time of writing, Scappman supports over 400+ third-party applications.
Lets look at Adobe as an example. The following Adobe Applications are supported today:

As an example, let’s install Adobe Acrobat Reader DC. I have customized the displayname with my own Prefix called “Global”. Default, pressing install would assign the application as required to All Computers.

Since Scappman can read Users and Groups from Azure AD we can also select a specific user or a group for the application assignment (excellent for testing purposes for example). For the group assignment we can select a single group or multiple groups and select if the assignment should be include or exclude, per group.

If we select Advanced we get several more useful deployment options. For example, we get the option to specify our own custom pre-install commands if we need to do anything specific before this application deployment is installed.

In this case, I want to make sure other non-managed versions of Adobe Reader already installed in the device gets uninstalled prior to Scappmans deployment. This is provided for us by Scappman as a default pre-installation command.

As I mentioned before, default of an application deployment in Scappman is required but we can change this to available if needed instead, which also lets us decide if we want future updates of the application to arrive to All Users, All Devices or only the specific assigned group we assigned before. When everything we want is selected, press Install to start the provisioning of the application.

Viewing Installations, we can now see that the application deployment is being prepared.

Selecting the application will provide more details about its version, if updates are enabled and current assignments.

Editing of the application is also possible from this view if needed.

Navigating to Microsoft Endpoint Manager, the initial application and it’s update deployment has been created and assigned.

Viewing Global – Adobe Acrobat Reader DC in MEM, we can see what Scappman created for us, including it’s install/uninstall commands and detection methods.

Before installation I wanted to add the Microsoft Information Protection plugin as a dependency to Adobe Reader.
I added MIP Plugin for Acrobat Reader DC and selected the newly created Global – Adobe Acrobat Reader DC as dependency.

Results
As seen below several Scappman published applications arrived in Company Portal.

I selected the MIP Plugin for installation and because of the dependency both Adobe Acrobat Reader DC + MIP Plugin got installed successfully.

For troubleshooting purposes logs are available at C:\ProgramData\Scappman\Logs.
According to the documentation Scappman collects logs for the IT Admin to view when an installation has failed.

Branding
To change the branding of Scappman from the default values, navigate to Settings / Branding and there we can easily change the Intune publisher name and also add the organizations own logo for the prompts issued by the Powershell App Deployment Toolkit.

Naming Convention
Scappman supports adjustment of prefix, postfix and custom naming on the different release rings of an application deployment.

Notifications & Reporting
When Scappman automatically have updated an application, this can be notified via email today. Hopefully in the future webhook-functionality gets implemented for Scappman so that this type of notification can arrive in for example Teams.

As an overview, the amount of application installations, computers and subscribed applications through Scappman can be viewed at the built-in Dashboard.

Overall status of all Applications published through Scappman is available under Reports. Here, version and amount of installed, failed, postponed, pending and other status values of application deployments can be viewed.

Existing Applications on Intune managed devices
Scappman cannot automatically detect existing applications from your Intune managed devices unless the application deployments are managed by Scappman. Hopefully this functionality gets added in the future, but as of now you need to know that a device has an older version of Adobe Reader for example and that can then be replaced with a Scappmans deployment which then gets automatically updated in the future.

Conclusion
Pricing of course depends on the size of the environment, but the current target price is 1€ per user per month. What I personally am hoping to see in the future is more reporting functionality and also integration with existing application deployments in Intune, all of the features launched and in development can be viewed at Scappmans Roadmap. Based on my testing Scappman is easy to setup, has fairly good support in terms of its application library and several customizable options for deployments. That Scappman is 100% Cloud only is a big plus. Suitable for small to mid cloud only environments where Intune is used, implementing the product could easily save lots of hours in terms of manual labor as long as the applications in use on the endpoints are supported by Scappman. 

Passwordless Authentication, Part 2: Temporary Access Pass, Security Key enrollment & Windows-Sign in

In my previous blogpost I demonstrated a basic enrollment of Passwordless authentication
into Azure AD with a FIDO2 Security Key.

Generally speaking, common use cases for FIDO2 certified hardware keys are as follows:

  • Strong Authentication
  • Securing Privileged Accounts
  • Passwordless Authentication
  • Shared Devices
  • Personal Security (Cloud Storage, Password Managers, Social Accounts)

In this post I will focus on provisioning Temporary Access Pass to end users for them being able to add a FIDO2 Security Key as Authentication Method for themselves in Azure AD.
FIDO2 Security Key can then be used as strong authentication during Windows Autopilot enrollment and is an alternative when mobile devices isn’t an option as MFA method.
Finally I will demonstrate that from there, the end user can either:

  • Provision their credentials into Windows Hello for Business (Security Key as MFA method)
  • Use FIDO2 Security Key as Sign-In method into Windows (recommended for a shared device)

Part 1. Temporary Access Pass and FIDO2 Security Key Enrollment

To provision a Temporary Access Pass we need to be able to enable the method and target it to a group (or All Users). This is done in Azure Active Directory \ Security \ Authentication Methods

We should note here that the properties and lifetime of the TAP-method can be adjusted as seen on the screenshots below. In my example I configured it like this:

When the method is enabled and targeted, we can add a TAP to a user graphically in the Azure Portal.
Select the user and Authentication Methods then select Add authentication method.

Select Temporary Access Method (preview) as method, then select Add.

The details are then provided for us and the next step should be to send the information to the end user for registration.
We can also provision TAP with Powershell instead of the GUI. See the example below:

Part 2. Use TAP as Sign-in for enabling strong authentication method (FIDO2 Security Key)

The end user navigates to My Security Info and then enters their email.

Instead of being prompted for their password, the end user will be prompted to enter their Temporary Access Pass instead.

Sign-In successful!

Let’s add Security Key as authentication method. Select Add method, choose Security key and click Add.

Select the type of the security key-

Insert the Security Key into the PC, then select Next.

Verify with OK, twice.

Time to create a PIN for this security key.

Verify with OK.

Finish the setup by touching the security key.

Finally, the end user needs to name the security key.

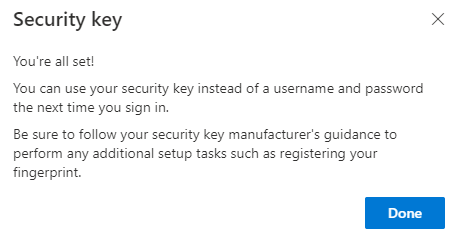
All Set!

We see that Security key now is available as an authentication method besides Temporary access pass.

Part 3. FIDO2 Security Key Sign-In, Autopilot Enrollment and Windows Hello for Business Provisioning

The end user has a new Windows 10 device which is in Windows Autopilot and the end user has access to the newly enrolled Security Key. Computer is powered on and the end user goes through the initial OOBE-steps until the end user arrives at the Sign-in.

Insert the security key into the PC. Here, the end user selects Sign in with security key. The end user then enters their security key PIN. And confirms their presence by touching the security key.

After successful Sign-In, Autopilot Enrollment is initiated.

Scenario A – Personal Device (WHfB Enrollment)
If the user or device is targeted with a Windows Hello for Business-policy (from MEM) the WHfB Enrollment will initiate usually at next Sign-in. This is the most suitable authentication method if the device is a personal device. When the Autopilot provisioning is done, the end user is prompted for setting up Windows Hello for Business.

Windows Hello for Business enrollment is initiated and since the PC has fingerprint sensor that method is presented first.

The end user then sets up the PIN for WHfB, encrypted and safely stored locally in the PCs TPM chip.

Success! Enrollment and Sign-In without using a password!

Scenario B – Shared Device (FIDO2 Windows Sign-in)
When the Autopilot provisioning is done (and Windows Hello for Business-policy is not targeted at the user), the end user can now Sign in into Windows with their Security Key instead of a password. This is the ideal authentication method when the device is shared or when mobile devices isn’t an option as MFA method.

The end user selects Sign-in options, then selects FIDO security key and inserts the key into the PC.

Enter PIN, then touch the security key.

Success! Enrollment and Sign-In without using a password!

For Passwordless Sign-In into Windows, see these Specific requirements for Azure AD Joined and Hybrid Azure AD Joined devices. If the device is using Windows 10 version 1903 or higher the end users themselves can adjust their security key biometric, PIN or reset their security key.
Windows Settings > Accounts > Security Key

As noted on Known Issues, administrator provisioning and de-provisioning of security keys is not yet available. However, we can at least as administrators remove the authentication method In Azure AD.

Attack Surface Reduction

In this blog post I will go through some of the different configuration options available for Attack Surface Reduction using Endpoint Manager (Intune), Defender for Endpoint and analyzing the rules locally using Powershell.

Short introduction
Attack Surface Reduction Rules in Windows 10 is a set of rules, designed to defend against different types of software behavior.
Examples of what they are aimed to do is prohibit malicious activities originating from:
– Executables and scripts (downloading or running files)
– Obfuscated and suspicious scripts
– Mitigation against uncommon behavior from apps (process-creation, execution etc.)

Attack Surface Reduction is available for Windows 10 Pro and Windows 10 E3 and E5.
E5 adds additional monitoring and analysis capabilities which natively is integrated into Defender for Endpoint.

Configuration options in Intune

Generally, your configuration options per rule are:
– Not Configured
– Audit
– Block

First option is to use a configuration profile in Intune (Endpoint Protection)
You will find it here: Endpoint Manager > Device Configuration Profile > Template > Endpoint Protection

Here you also have the ability to utilize exceptions for files and folders if needed. 

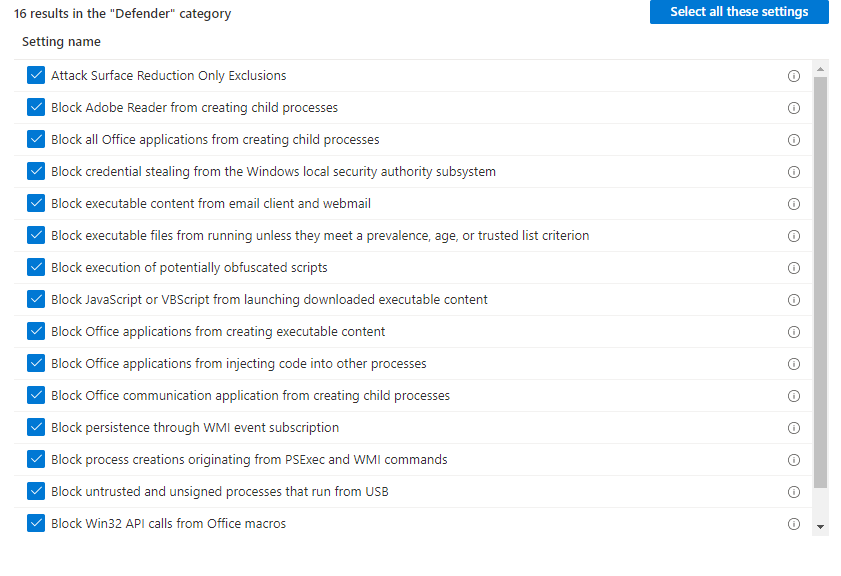
Second option is to use the new Settings catalog on the Category Defender will yield the same configurable settings as seen below.

Third option is to use the rules in a Security Baseline (MDM or Defender for Endpoint).
MDM Security Baseline – Rules are a bit scattered and located in the category Microsoft Defender. They needs to be configured manually per rule.

In the Defender for Endpoint Baseline the Attack Surface Reduction Rules are pre-configured for you.

Fourth option is configuring the settings using Endpoint Security
Endpoint Security > Attack Surface Reduction

Basically the same as the Endpoint Protection option. Controlled Folder Access is also included in this policy.
Fifth option is using OMA-URI but generally I would not recommend it.

Monitoring Attack Surface Reduction

Monitor locally in a Windows Device
When a Rule is in place, either in audit or block mode. With Windows 10 E3 you will need to monitor the status of the different ASR-rules in the local event log of the device.

SecurityLogsIDComment
Attack Surface ReductionMicrosoft/Windows/Windows Defender/Operational5007Event when settings are changed
 Windows Defender (Operational)1122Event when rule fires in Audit-mode
 Windows Defender (Operational)1121Event when rule fires in Block-mode
    
Controlled Folder Access /
Advanced Ransomware Protection
Microsoft/Windows/Windows Defender/Operational5007Event when settings are changed
 Windows Defender (Operational)1124       Audited controlled folder access event
 Windows Defender (Operational)1123       Blocked controlled folder access event

Monitor using Defender for Endpoint
If you are using Defender for Endpoint (are using M365 E5) then you can use the Security-portal for some of the configuration and also utilize it for optimal monitoring of ASR-detections.
Aka.ms/ASRExclusionWorkflow

Configurations –
https://security.microsoft.com/asr?viewid=configuration

Detections – https://security.microsoft.com/asr?viewid=detections
Here you will see detections and the full path to related applications, services who are impacted by the auditing or blocking. Since this is visible centrally, it’s the easiest place to find the information you need for mitigations/adjustments.
 
Advanced Hunting
Status of ASR-rules can also be verified through Advanced Hunting (in Defender for Endpoint or in the M365 Defender Security Center) Example KQL Query:

DeviceEvents
| where ActionType startswith ‘Asr’

Local ASR Script Analyzer and the ASR GUI
ASR Analyzer is a simple Powershell-script which will analyze your current ASR-rules settings in your device.
Script is from anthonws and can be downloaded here. Testing it on my device shows that currently, no rules are in audit nor in block mode.

If we just want to test things locally, without configuring anything centrally I would recommend using the ASR GUI by hemaurer. By running the ASR GUI we can in a very quick and easy manner enable every rule and then save the configuration (notice the current ASR-settings detected at the bottom).

If we run the ASR-Analyzer script again, we see that every ASR-rule now is in block mode.

Attack Surface Reduction technical defense role in a real world example
Below, you’ll see Doppelpaymer Ransomware’s attack chain to the right with each step categorized by MTRE ATTACK classifications. To the left you see the recommended mitigations and defenses against each technique where some of them are mapped to it’s corresponding ASR-rules.

Further reading from Microsoft on the topic of Ransomware and Attack Surface Reduction here.

Security Posture

I’ve updated my Powershell-script for detecting the status of different security related device features and settings related to Windows 10. The basic idea of this script is to quickly get an overview of the overall security posture of a Windows 10 device, at the device level.

Currently the script detects the status of:

  • Operating System
  • TPM
  • Bitlocker
  • UEFI
  • SecureBoot
  • Defender
  • CloudProtectionService (MAPS for Defender)
  • Defender for Endpoint
  • ApplicationGuard
  • Windows Sandbox
  • Credential Guard
  • Device Guard
  • Attack Surface Reduction
  • Controlled Folder Access

The script will write entries to a log file residing at the client (C:\Windows\Temp\Client-SecurityPosture.log)
which preferably is read using CMTrace or OneTrace.

Install the Script

Or you can download it manually from my Github.

Running the Script
Executing the script with the switch -Help (SecurityPosture -Help)
will display a brief description and all the current available options:

Next thing to try is running the script querying every function in it.
The status of more functions and features will be displayed:

Security Posture has support for running each individual check as a separate switch as well.
Here I query Operating System and Defender as an example:

Logging
As I stated in the beginning of this post. the script will write entries to a log file residing at the client at C:\Windows\Temp\Client-SecurityPosture.log which preferably is read using CMTrace or OneTrace.

Example:

Suggestions and ideas regarding improvement are always welcome.

SecurityPosture at Github & PowerShell Gallery

ABM – Invalid Profile during enrollment (Default Enrollment Restriction)

I stumbled upon a pretty dazzling error the other day where the solution wasn’t too obvious for me so I thought I would share my findings.

Prerequisites which all were in place:
– Apple Business Manager configured and Apple-devices where transmitted from reseller.
– Integration with Intune in place and devices successfully synced to my Intune-tenant.
– ABM-profile assigned to the successfully synced devices with User Affinity-setting configured.

During the provisioning of the device when the iPhone or iPad is turned on after the device has connected to cellular or WiFi, the ABM-profile is about to be downloaded to the device. But this time it only got prompted with “Invalid Profile”.

I tried deleting the device from Intune and re-synced ABM, I also tried modifying the settings for the ABM-profile and redeployed the ABM-token in Intune. I even tried resetting the whole ABM-integration between Intune and ABM but nothing solved my issue. The solution was instead, related to my Enrollment Restriction setup. You can find your enrollment restrictions in Endpoint Manager by going here and navigating to Devices/Enroll Devices and then Enrollment Restrictions.

Check out your Default restriction targeting All Users, and be sure to note the description of it:
This is the default Device Type Restriction applied with lowest priority to all users regardless of group membership.”

That’s what I had missed. I had made another Device type restriction with priority 1, that targeted my Intune Users and in that restriction iOS were allowed for enrollment. Beneath that one, in the Default restriction iOS was blocked. The result is that manual user driven Intune-enrollment for a mobile device works for users who are members of my Intune-Users group but the automatic enrollment by Apple Business Manager did not.

Conclusion: in other words, my bad! I had modified the default one way before the ABM-integration was in place and the regular iPhone-enrollments worked flawlessly. So be sure to double check your Enrollment Restrictions if you stumble upon any ABM Invalid Profile related errors.

Post a policy to Intune using Intune PowerShell SDK

In my last post regarding the MSGraph and the Intune PowerShell SDK I demonstrated how you installed the Intune PowerShell SDK and connected to the Graph Explorer to query information in your tenant of choice.

Today I will demonstrate how you can monitor (by the help of your web-browser) which json-values are produced when you create a Compliance Policy in Intune which you then in turn can use to create the same policy in Powershell to a tenant of your choice by the help of Intune PowerShell SDK. In my example I used Microsoft Edge as browser.

Start by logging in to your tenant of choice: https://endpoint.microsoft.com
Navigate to Devices/Windows/Compliance Policies.
Press F12 to start recording Network Activity in your Microsoft Edge browser.

To see in the recording what actually gets sent to the backend when you create something in Microsoft Endpoint Manager (Intune), let’s create a policy. In my example I chose a Compliance policy for Windows 10. Choose a name and a value for Minimum OS version. I used these values:
Name: Windows10-Compliance
Minimum OS version: 10.0.18363.778

When you have created your policy, you probably noticed that many things happened in the backend (to your right in the browser) during the recording of the network activity. To filter some of the results out you can type in “Devicecompliancepolicies” in the filter-field. Browse through the different entries until you find a POST entry with the graph URL under ‘General’ which is the one we are after right now.
Request URL: https:/graph.microsoft.com/beta/deviceManagement/deviceCompliancePolicies
Request Method: POST

As you see above, the information which got posted to the Graph is expandable.

Now, to the fun part. You can use the Intune Powershell SDK to post these values into a tenant of your choice. To do this, install (if you haven’t already), import the Microsoft.Graph.Intune module and then authenticate using Connect-MSGraph.

https://gist.github.com/Sculpin90/1c1d18a443a06d8937d09540fd174192
When your UPN and your TenantID appears in Powershell, you’re successfully authenticated to the tenant and the module is now being operational.
https://gist.github.com/Sculpin90/8cd9cda50ece62ea8713ce62c0c75d6c

When you are connected to your tenant in your session, copy the code above to your current Powershell-window and run it to post a Windows 10 Compliance Policy to your tenant.