Passwordless Authentication, Part 2: Temporary Access Pass, Security Key enrollment & Windows-Sign in

In my previous blogpost I demonstrated a basic enrollment of Passwordless authentication
into Azure AD with a FIDO2 Security Key.

Generally speaking, common use cases for FIDO2 certified hardware keys are as follows:

  • Strong Authentication
  • Securing Privileged Accounts
  • Passwordless Authentication
  • Shared Devices
  • Personal Security (Cloud Storage, Password Managers, Social Accounts)

In this post I will focus on provisioning Temporary Access Pass to end users for them being able to add a FIDO2 Security Key as Authentication Method for themselves in Azure AD.
FIDO2 Security Key can then be used as strong authentication during Windows Autopilot enrollment and is an alternative when mobile devices isn’t an option as MFA method.
Finally I will demonstrate that from there, the end user can either:

  • Provision their credentials into Windows Hello for Business (Security Key as MFA method)
  • Use FIDO2 Security Key as Sign-In method into Windows (recommended for a shared device)

Part 1. Temporary Access Pass and FIDO2 Security Key Enrollment

To provision a Temporary Access Pass we need to be able to enable the method and target it to a group (or All Users). This is done in Azure Active Directory \ Security \ Authentication Methods

We should note here that the properties and lifetime of the TAP-method can be adjusted as seen on the screenshots below. In my example I configured it like this:

When the method is enabled and targeted, we can add a TAP to a user graphically in the Azure Portal.
Select the user and Authentication Methods then select Add authentication method.

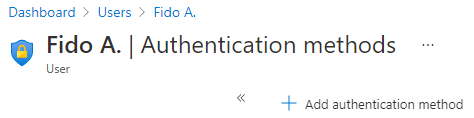
Select Temporary Access Method (preview) as method, then select Add.

The details are then provided for us and the next step should be to send the information to the end user for registration.

We can also provision TAP with Powershell instead of the GUI. See the example below:

Part 2. Use TAP as Sign-in for enabling strong authentication method (FIDO2 Security Key)

The end user navigates to My Security Info and then enters their email.

Instead of being prompted for their password, the end user will be prompted to enter their Temporary Access Pass instead.

Sign-In successful!

Let’s add Security Key as authentication method. Select Add method, choose Security key and click Add.

Select the type of the security key-

Insert the Security Key into the PC, then select Next.

Verify with OK, twice.

Time to create a PIN for this security key.

Verify with OK.

Finish the setup by touching the security key.

Finally, the end user needs to name the security key.

All Set!

We see that Security key now is available as an authentication method besides Temporary access pass.

Part 3. FIDO2 Security Key Sign-In, Autopilot Enrollment and Windows Hello for Business Provisioning

The end user has a new Windows 10 device which is in Windows Autopilot and the end user has access to the newly enrolled Security Key. Computer is powered on and the end user goes through the initial OOBE-steps until the end user arrives at the Sign-in.

Insert the security key into the PC. Here, the end user selects Sign in with security key. The end user then enters their security key PIN. And confirms their presence by touching the security key.

After successful Sign-In, Autopilot Enrollment is initiated.

Scenario A – Personal Device (WHfB Enrollment)
If the user or device is targeted with a Windows Hello for Business-policy (from MEM) the WHfB Enrollment will initiate usually at next Sign-in. This is the most suitable authentication method if the device is a personal device. When the Autopilot provisioning is done, the end user is prompted for setting up Windows Hello for Business.

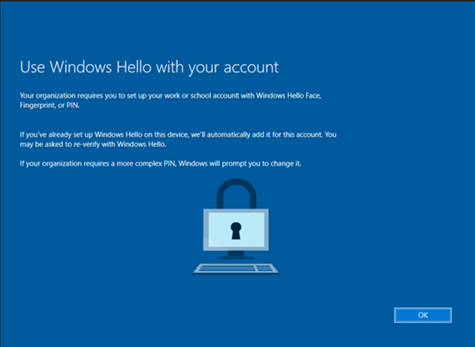
Windows Hello for Business enrollment is initiated and since the PC has fingerprint sensor that method is presented first.

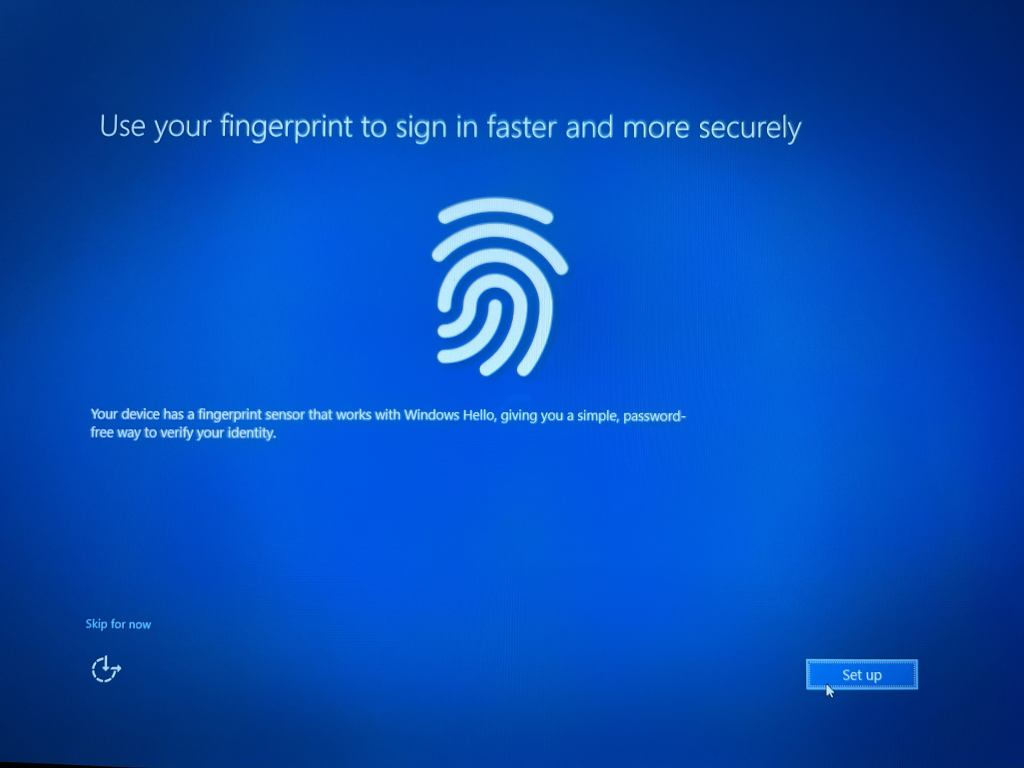
The end user then sets up the PIN for WHfB, encrypted and safely stored locally in the PCs TPM chip.

Success! Enrollment and Sign-In without using a password!

Scenario B – Shared Device (FIDO2 Windows Sign-in)
When the Autopilot provisioning is done (and Windows Hello for Business-policy is not targeted at the user), the end user can now Sign in into Windows with their Security Key instead of a password. This is the ideal authentication method when the device is shared or when mobile devices isn’t an option as MFA method.

The end user selects Sign-in options, then selects FIDO security key and inserts the key into the PC.

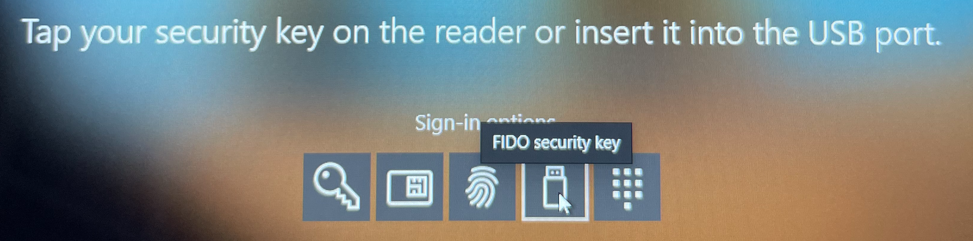
Enter PIN, then touch the security key.

Success! Enrollment and Sign-In without using a password!

For Passwordless Sign-In into Windows, see these Specific requirements for Azure AD Joined and Hybrid Azure AD Joined devices. If the device is using Windows 10 version 1903 or higher the end users themselves can adjust their security key biometric, PIN or reset their security key.
Windows Settings > Accounts > Security Key

As noted on Known Issues, administrator provisioning and de-provisioning of security keys is not yet available. However, we can at least as administrators remove the authentication method In Azure AD.

Security Posture

I’ve updated my Powershell-script for detecting the status of different security related device features and settings related to Windows 10. The basic idea of this script is to quickly get an overview of the overall security posture of a Windows 10 device, at the device level.

Currently the script detects the status of:

  • Operating System
  • TPM
  • Bitlocker
  • UEFI
  • SecureBoot
  • Defender
  • CloudProtectionService (MAPS for Defender)
  • Defender for Endpoint
  • ApplicationGuard
  • Windows Sandbox
  • Credential Guard
  • Device Guard
  • Attack Surface Reduction
  • Controlled Folder Access

The script will write entries to a log file residing at the client (C:\Windows\Temp\Client-SecurityPosture.log)
which preferably is read using CMTrace or OneTrace.

Install the Script

Or you can download it manually from my Github.

Running the Script
Executing the script with the switch -Help (SecurityPosture -Help)
will display a brief description and all the current available options:

Next thing to try is running the script querying every function in it.
The status of more functions and features will be displayed:

Security Posture has support for running each individual check as a separate switch as well.
Here I query Operating System and Defender as an example:

Logging
As I stated in the beginning of this post. the script will write entries to a log file residing at the client at C:\Windows\Temp\Client-SecurityPosture.log which preferably is read using CMTrace or OneTrace.

Example:

Suggestions and ideas regarding improvement are always welcome.

SecurityPosture at Github & PowerShell Gallery

Post a policy to Intune using Intune PowerShell SDK

In my last post regarding the MSGraph and the Intune PowerShell SDK I demonstrated how you installed the Intune PowerShell SDK and connected to the Graph Explorer to query information in your tenant of choice.

Today I will demonstrate how you can monitor (by the help of your web-browser) which json-values are produced when you create a Compliance Policy in Intune which you then in turn can use to create the same policy in Powershell to a tenant of your choice by the help of Intune PowerShell SDK. In my example I used Microsoft Edge as browser.

Start by logging in to your tenant of choice: https://endpoint.microsoft.com
Navigate to Devices/Windows/Compliance Policies.
Press F12 to start recording Network Activity in your Microsoft Edge browser.

To see in the recording what actually gets sent to the backend when you create something in Microsoft Endpoint Manager (Intune), let’s create a policy. In my example I chose a Compliance policy for Windows 10. Choose a name and a value for Minimum OS version. I used these values:
Name: Windows10-Compliance
Minimum OS version: 10.0.18363.778

When you have created your policy, you probably noticed that many things happened in the backend (to your right in the browser) during the recording of the network activity. To filter some of the results out you can type in “Devicecompliancepolicies” in the filter-field. Browse through the different entries until you find a POST entry with the graph URL under ‘General’ which is the one we are after right now.
Request URL: https:/graph.microsoft.com/beta/deviceManagement/deviceCompliancePolicies
Request Method: POST

As you see above, the information which got posted to the Graph is expandable.

Now, to the fun part. You can use the Intune Powershell SDK to post these values into a tenant of your choice. To do this, install (if you haven’t already), import the Microsoft.Graph.Intune module and then authenticate using Connect-MSGraph.

https://gist.github.com/Sculpin90/1c1d18a443a06d8937d09540fd174192
When your UPN and your TenantID appears in Powershell, you’re successfully authenticated to the tenant and the module is now being operational.
https://gist.github.com/Sculpin90/8cd9cda50ece62ea8713ce62c0c75d6c

When you are connected to your tenant in your session, copy the code above to your current Powershell-window and run it to post a Windows 10 Compliance Policy to your tenant.

Check MFA-Status of Users (Powershell)

Finding information about MFA on a user in Azure Active Directory can be achieved in mutiple ways. Here, I will describe an easy way of finding MFA-information (registered, and by which method) by using Powershell, the cmdlet Get-Msoluser and its related property StrongAuthenticationMethods.

Prerequisite:
Install the powershell Module MSOnline:
Install-Module MSOnline
Then, connect to the service in Powershell by:
Connect-MsolService

When authenticated, query all users who have MFA activated using the following code:
Get-MsolUser -All | where {$_.StrongAuthenticationMethods -ne $null} | Select-Object -Property UserPrincipalName

Now, let’s expand the property StrongAuthenticationMethods to get more information about MFA’s state, and which MFA-method the user has configured MFA with:
Get-MsolUser -All | Where {$_.UserPrincipalName} | Select UserPrincipalName, DisplayName, @{n=”Status”; e={$_.StrongAuthenticationRequirements.State}}, @{n=”Methods”; e={($_.StrongAuthenticationMethods).MethodType}}, @{n=”Chosen Method”; e={($_.StrongAuthenticationMethods).IsDefault}} | Out-GridView

Useful result when working with Microsoft 365 and MFA. As you see above, allowed methods in my tenant is PhoneAppOTP and PhoneAppNotification (Microsoft Authenticator). The chosen method for this users MFA is PhoneAppNotification. The reason why the Status-field is empty is because this user activated MFA via a Conditional Access Policy and the MFA is not enabled/Enforced via the old MFA-portal.

Install the Intune Powershell Module

The Intune Powershell Module is a great addition to the current
Device Management-portal when it comes to Intune management.
Note: An account with the role Global Administrator is required for the authentication and the consent of this module for your tenant.

1. Start Powershell as an administrator and install the Intune Powershell Module typing in the command: Install-Module -Name Microsoft.Graph.Intune
Confirm the install by clicking Yes to all.


2. Then we need to authenticate to the tenant of your choice.
Do this by typing in the command: Connect-MSGraph


3. Sign with your account, enter your credentials and then press Sign in

3. An account with the role Global administrator is required since the module needs to be delegated some rights on behalf of the organizaton. Check “Consent on behalf of your organization” and then press Accept.

5. When your UPN and your TenantID appears in Powershell, you’re successfully authenticated to the tenant and the module is now being operational.

6. To show all the commands the module has to offer, type in:
Get-Command -Module Microsoft.Graph.Intune

7. There are plenty of commands you can utilize from this module, as of right now the total count is 914.

To count all the commands which are currently included in the module, enter:
(Get-Command -Module Microsoft.Graph.Intune).count